• AI Tools
    • Face Restoration
    • Inpainting & Removal
    • Background Removal
    • Image Upscale
    • Image De-oldify
    • Face to Sticker
    • Prompt Generation
    • Photo to Anime
  • Tools
    • Column 1
      • Essential
        • Photo Editor
        • Background Remover
        • Image Cropper
        • Image Resizer
        • Image Flipper
        • Image Brightener
        • Image Darkener
        • Text Editor
        • Color Replacer
        • Photo Blur
    • Column 2
      • Filters & Effects
        • Photo Cartoonizer
        • NFT Maker
        • Photo to Painting
        • Photo to Drawing
        • Photo to Sketch
        • Image Posterizer
        • Color Inverter
        • Sepia Converter
        • Grayscale Images
        • Photo Filters
        • Photo Frames
        • FX Cartoonizer
    • Column 6
      • Overlays & Masks
        • Image Masking
        • Mystical Fog
        • Falling Rain
        • Falling Snow
        • Add Glitch
        • Add Bokeh
        • Add Light Leaks
        • Image Blender
    • Column 3
      • Social Media
        • Profile Picture Maker
        • Avatar Maker
        • Meme Generator
        • Watermark Photos
        • Twitch Banner Maker
        • Photo Combiner
    • Column 4
      • Converters
        • PNG to JPG
        • JPG to PDF
        • PNG Converter
        • PNG Maker
        • Image Compressor
    • Column 5
      • Creative
        • Image Pixelator
        • Color Splash
        • Draw on Pictures
        • Background Changer
        • Hair Color Changer
        • Color Picker
        • Circle Cropper
  • Features
  • Pricing
  • Learn
  • Support
  • More
    • About us
    • Affiliate program
    • Contact us
© All rights reserved.
Photo to Cartoon – Cartoonize Yourself & Create Avatar Characters for Free Photo to Cartoon – Cartoonize Yourself & Create Avatar Characters for Free
  • AI Tools new
    • Face Restoration
    • Inpainting & Removal
    • Background Removal
    • Image Upscale
    • Image De-oldify
    • Face to Sticker
    • Prompt Generation
    • Photo to Anime
  • Tools
    • Column 1
      • Essential
        • Photo Editor
        • Background Remover
        • Image Cropper
        • Image Resizer
        • Image Flipper
        • Image Brightener
        • Image Darkener
        • Text Editor
        • Color Replacer
        • Photo Blur
    • Column 2
      • Filters & Effects
        • Photo Cartoonizer
        • NFT Maker
        • Photo to Painting
        • Photo to Drawing
        • Photo to Sketch
        • Image Posterizer
        • Color Inverter
        • Sepia Converter
        • Grayscale Images
        • Photo Filters
        • Photo Frames
        • FX Cartoonizer
    • Column 6
      • Overlays & Masks
        • Image Masking
        • Mystical Fog
        • Falling Rain
        • Falling Snow
        • Add Glitch
        • Add Bokeh
        • Add Light Leaks
        • Image Blender
    • Column 3
      • Social Media
        • Profile Picture Maker
        • Avatar Maker
        • Meme Generator
        • Watermark Photos
        • Twitch Banner Maker
        • Photo Combiner
    • Column 4
      • Converters
        • PNG to JPG
        • JPG to PDF
        • PNG Converter
        • PNG Maker
        • Image Compressor
    • Column 5
      • Creative
        • Image Pixelator
        • Color Splash
        • Draw on Pictures
        • Background Changer
        • Hair Color Changer
        • Color Picker
        • Circle Cropper
  • Features
  • Pricing
  • Learn
Get started
Sign in

Sign in

Photo to Cartoon – Cartoonize Yourself & Create Avatar Characters for Free

How to Overlay Images With and Without Photoshop

Home / Learn / Blog / How to Overlay Images With and Without Photoshop
By Editorial inBlog, Tutorials
After
Before

We all know that in photography, overlays are essentially an image or texture that is added to your photos using an editing application. Photoshop is one of the few programs that is used most frequently for this process.

Photographers use overlays to add texture and other things to an image. This basically means that there is an extra layer that can be added to a photo during the editing or post-production process to make it look better.

History of Overlay Images

Before the advent of Photoshop, photographers experimented with a variety of techniques to get a similar end result. They overexposed the photographs and scraped the negatives with pins and other abrasive items.

These days, putting on an overlay will only take a few minutes of your time. The creation of a nuanced effect is easy to create by dragging, dropping, and modifying the blending mode and opacity.

Common Types of Overlay
  • Light leaks
  • Sun flares
  • Vintage overlays
  • Grunge overlays
  • Patterns
  • Film effects

How to Create a Simple Overlay in Photoshop

Using the power of texture and layering, overlays may dramatically alter a photograph and make an otherwise dull photograph more engaging.

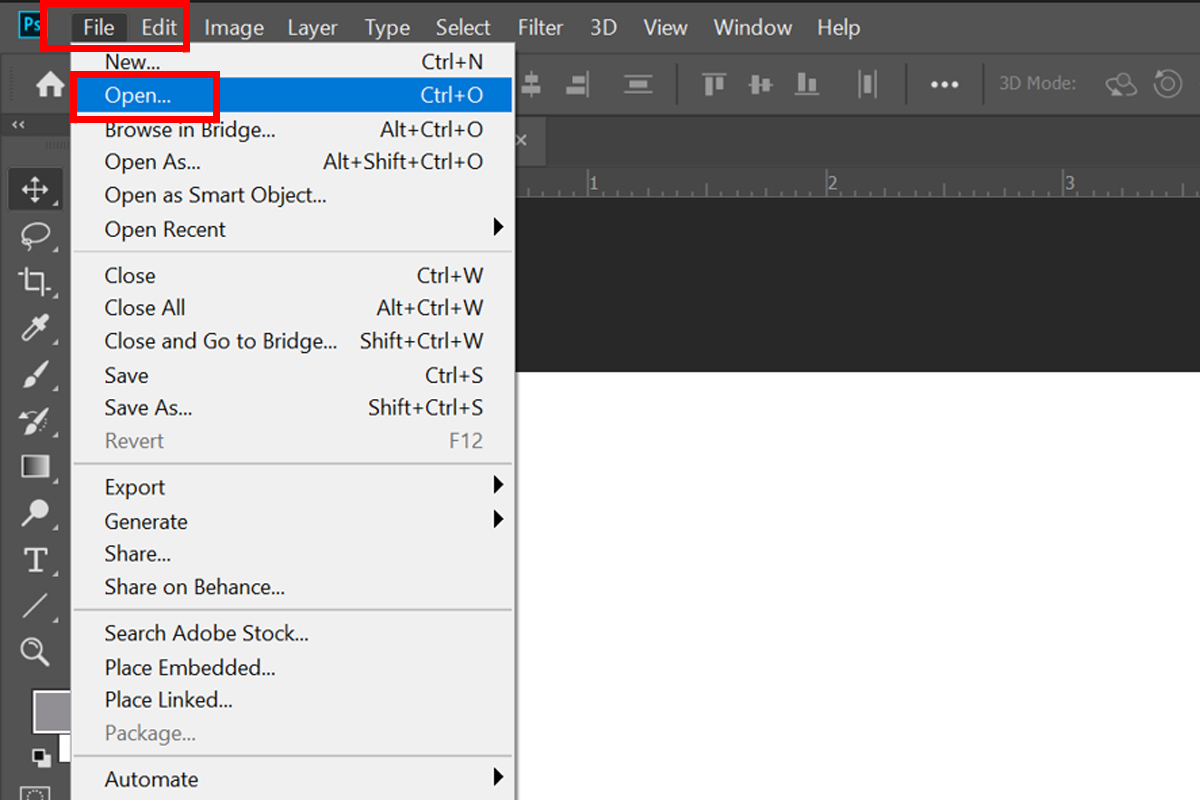
Step 1: Start by opening an image in Photoshop. To open your desired base image, navigate to File and click Open.

Step 2: Next is open your second image. One easy was is to drag the second image from its folder on top of your base image.


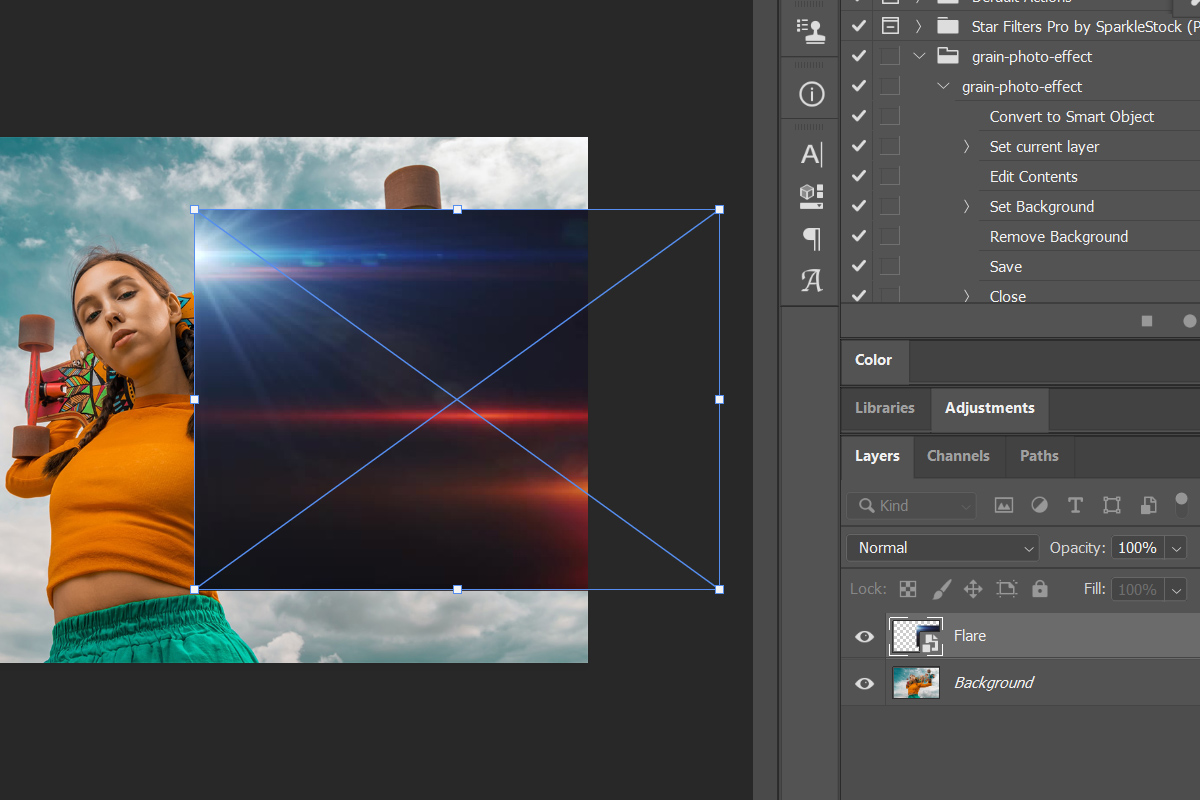
Adjust the size or placement to fit your base image.

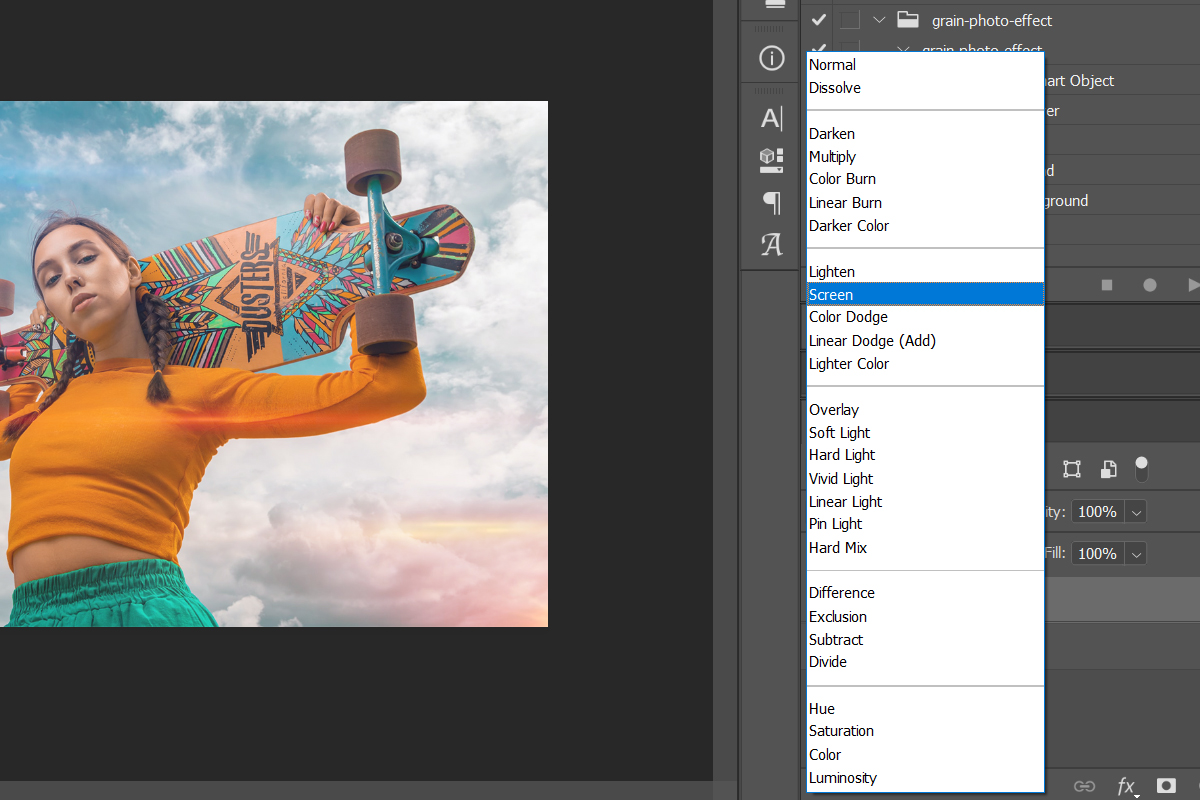
Step 3: Click on the Blending Mode dropdown box.

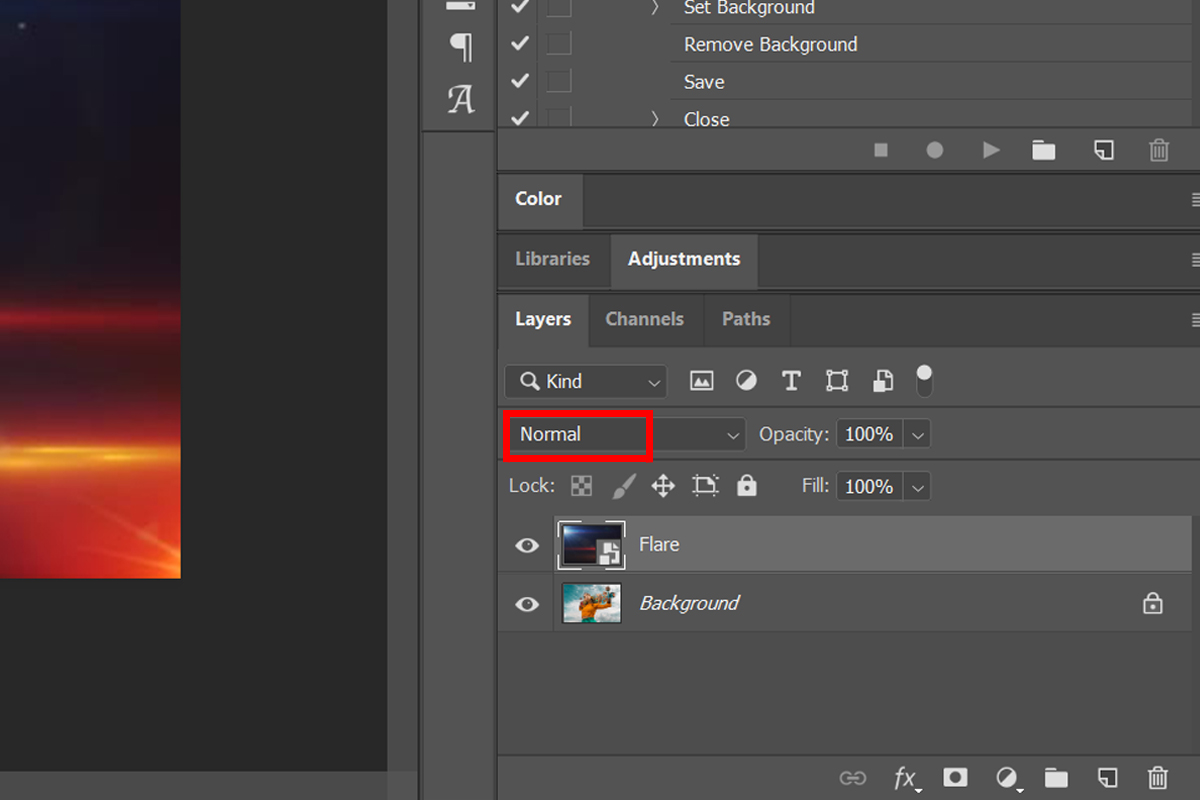
Pick a Blending mode that will work for your image. We will use Screen mode for this example.

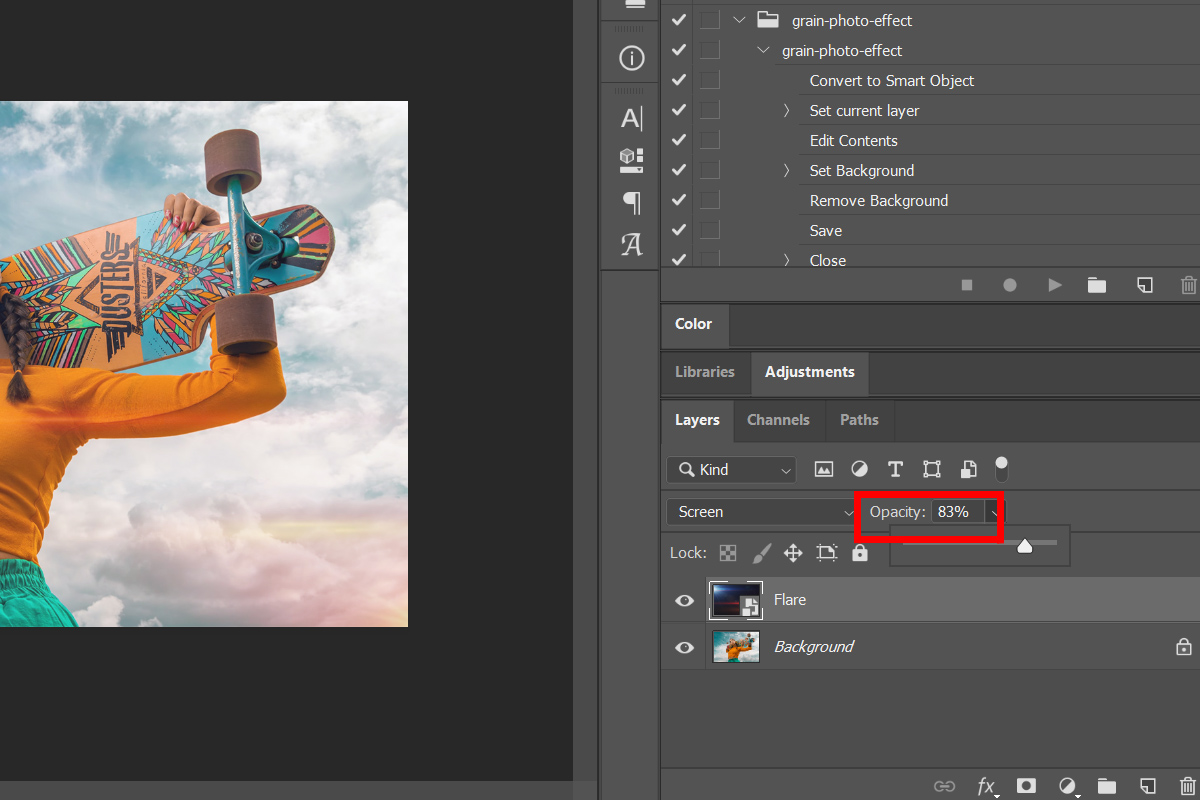
Step 4: Change the Opacity of your second image in the upper right corner of the layers panel as shown on the image below. Adjust the slider to achieve your desired look.

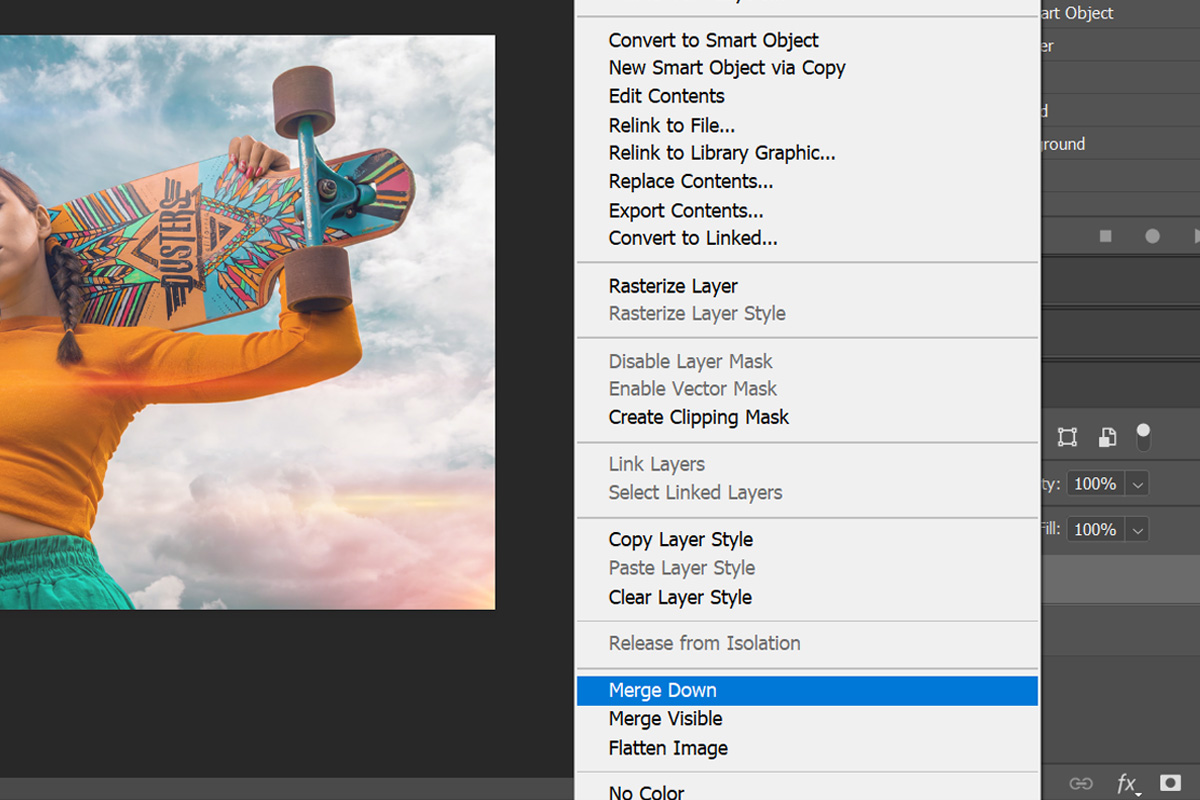
Step 5: Merge your base image and your second image.
Right click on the second image’s layer and click Merge Down.


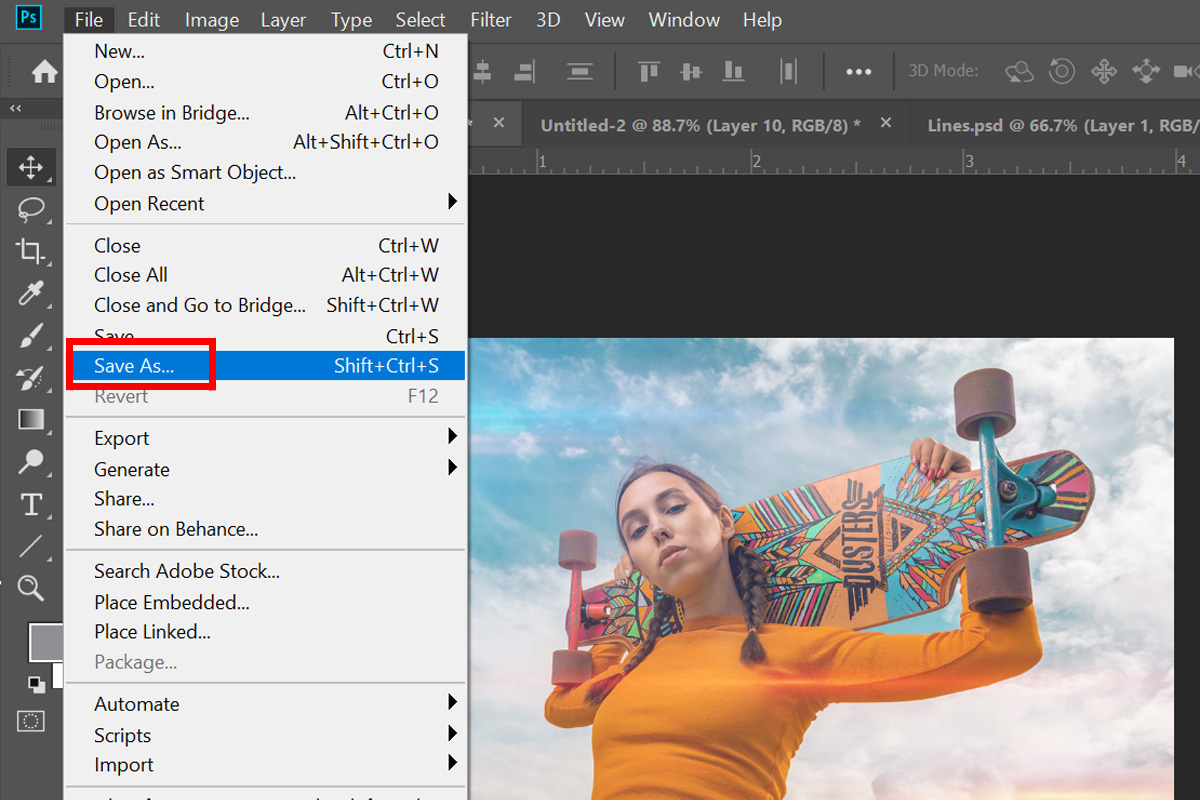
Step 6:
Save the image. To do this navigate to File — Save As.


Creating Overlay Images Without Photoshop

We know that some people find it hard to figure out how to use Photoshop. It can be tricky to learn how to use such a program. There are many alternative ways to add a beautiful overlay to your image. This simple step-by-step guide using Colorcinch will help you achieve the same result.

After Option 2
Before (2)

Method 1 – Filter Overlay

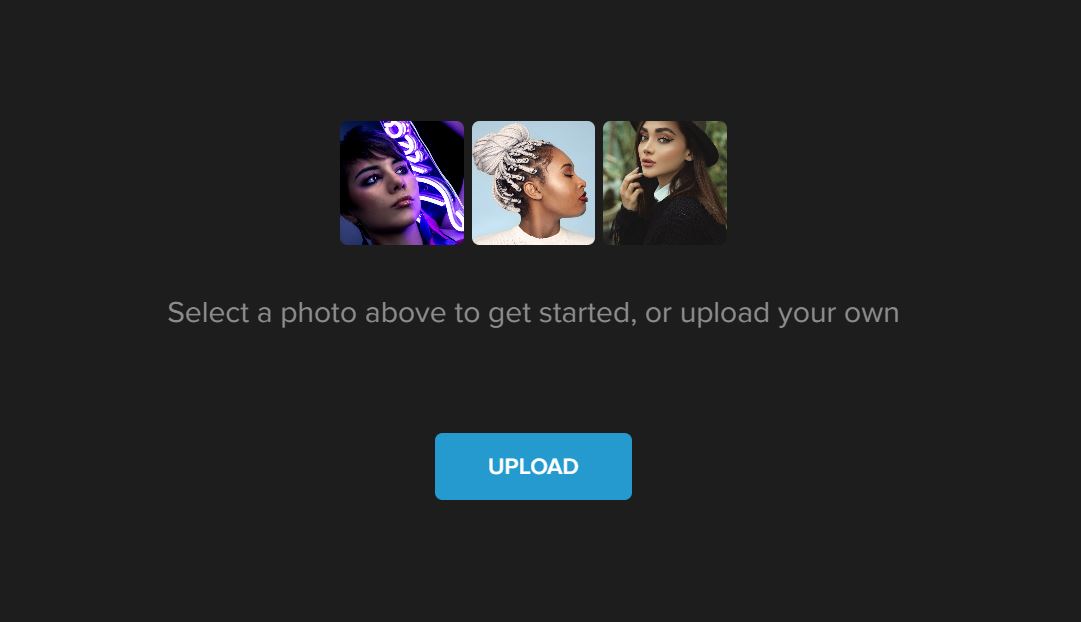
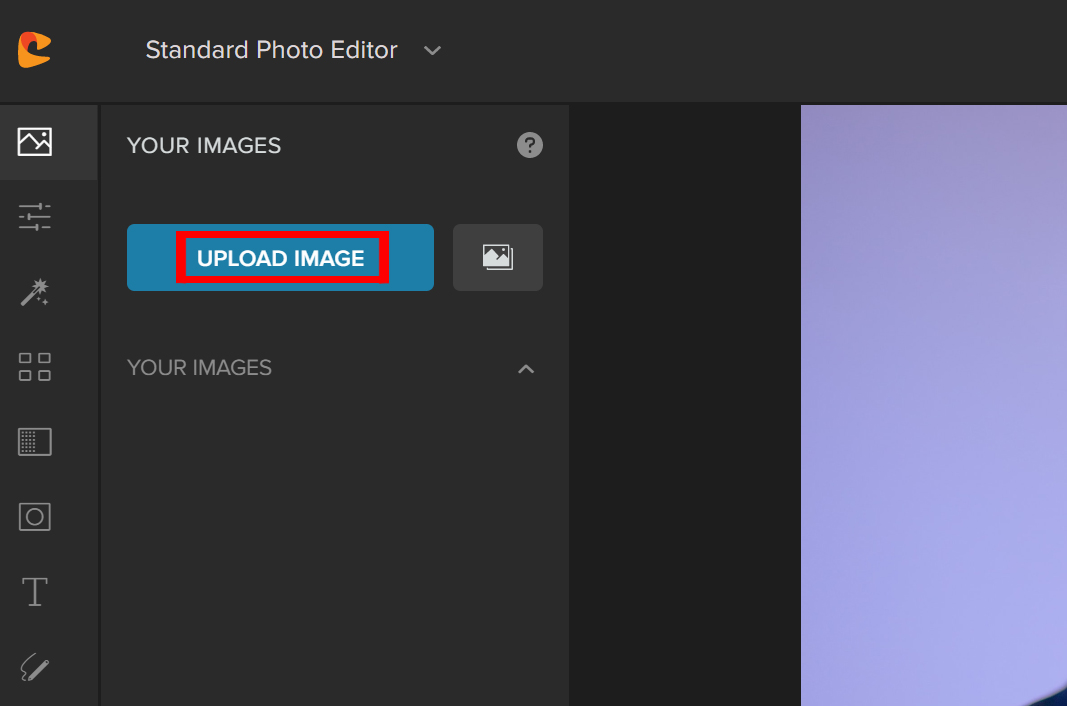
Step 1: Upload your image to Colorcinch.


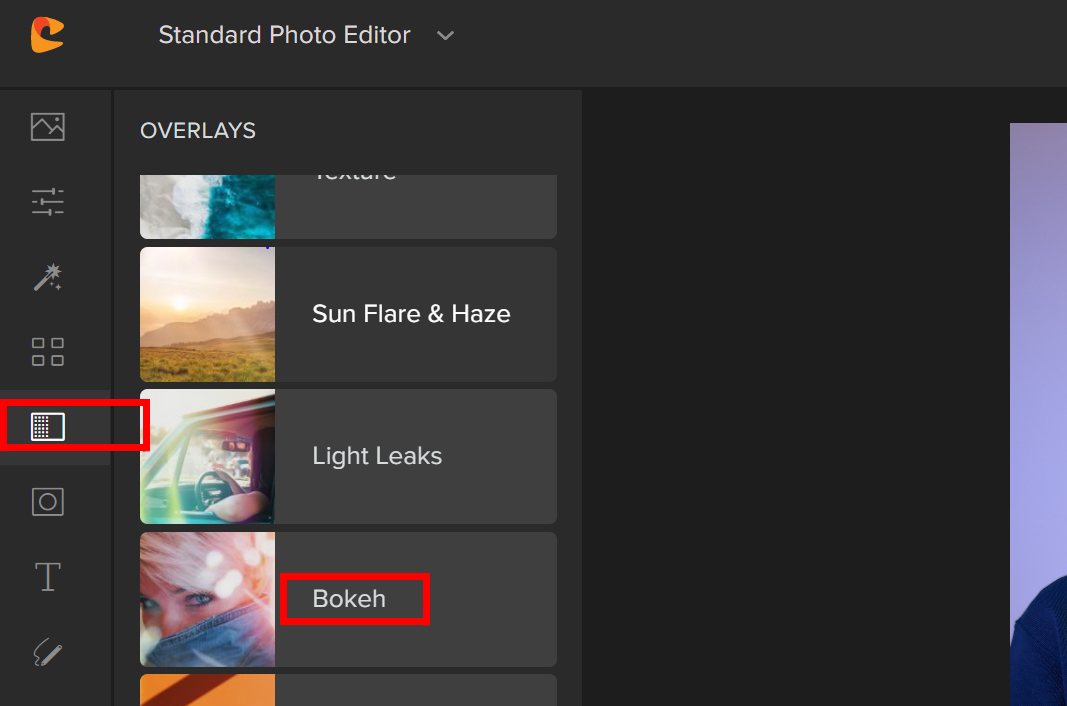
Step 2:
Click Overlay on the left side of the panel and it will open a tab of overlay filters. Navigate through it and feel free to use any filter you like. For this tutorial, I will use Bokeh.


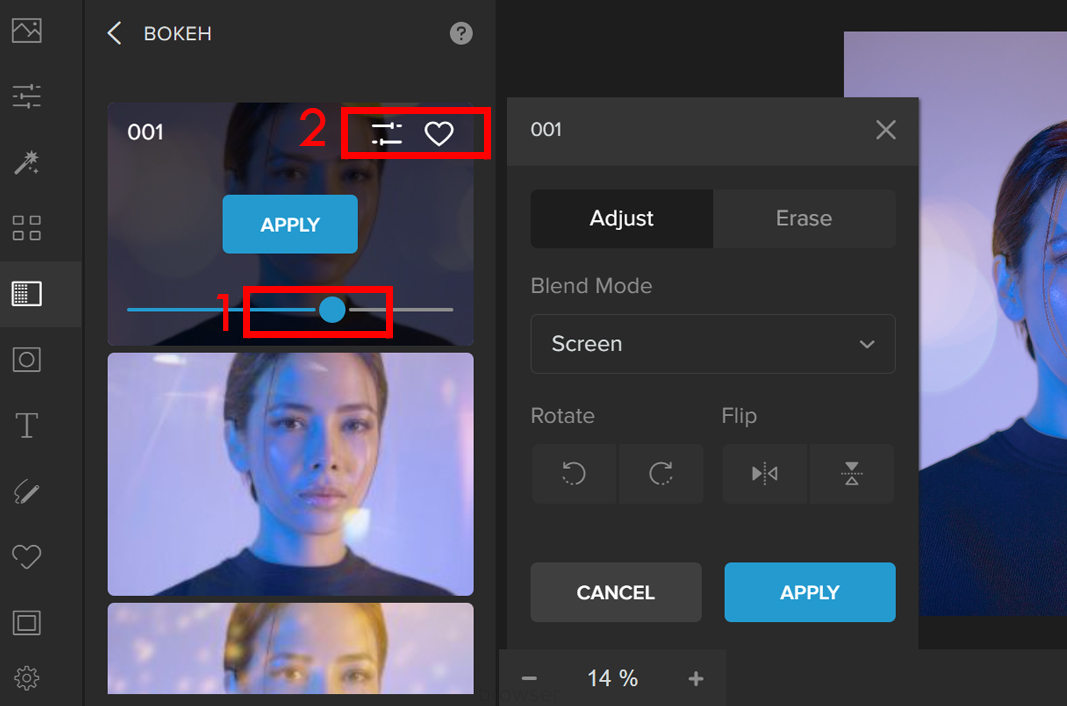
Adjust the slider to change the opacity of the overlay. If you wish to have more control of the chosen overlay, there is an advanced option that you can play around with.


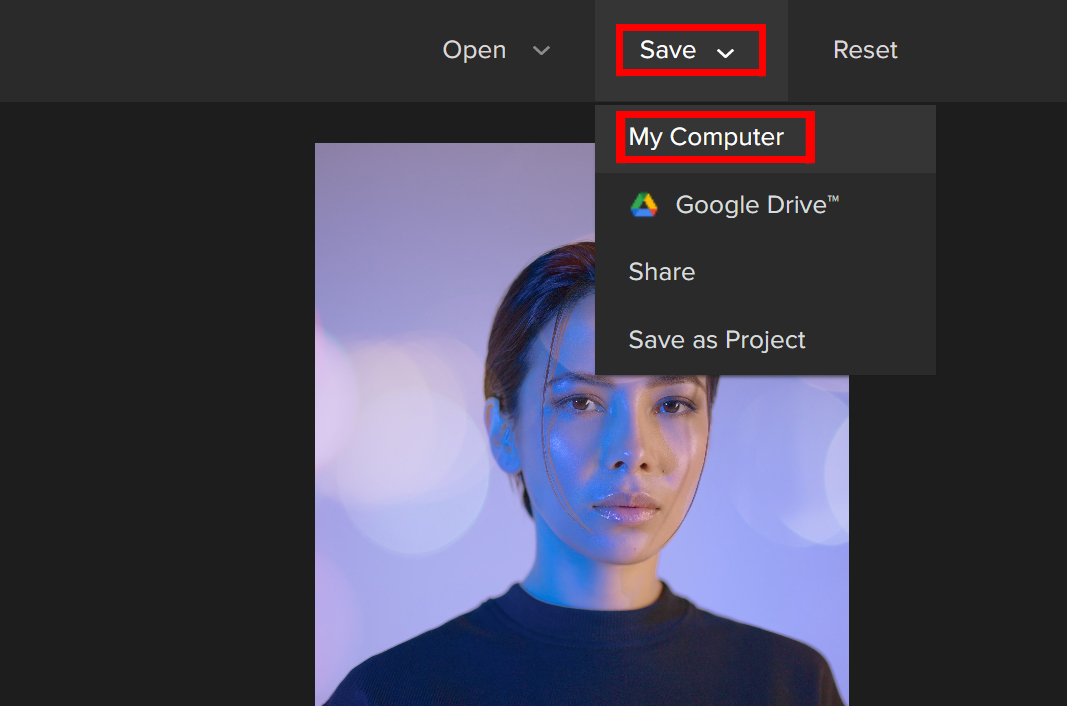
Step 3: Save the image.

Method 2 – Manual Overlay

Another easy way would be to do a manual overlay using the Blend Mode feature.

Step 1: Upload your image.


Step 2
: Navigate to the Image Manager.

Click on Upload Image to add your second image.


Step 3
: Drag the second image on top of the base image.

Adjust the second image to match the base image.
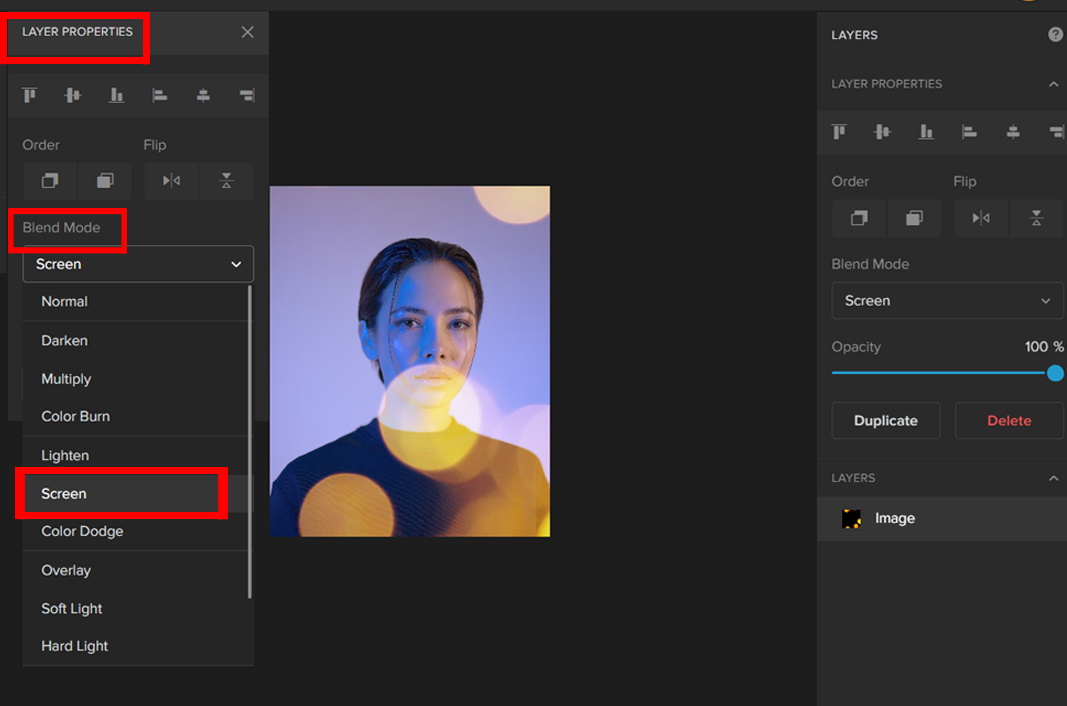


Step 4
: Change the Blend Mode by clicking on Layer Properties button and navigate to the drop down menu.

Try the different blend modes until you get your desired output. For this example I chose the Screen Mode.


Step 5:
Save the image.

In Conclusion

The easiest and quickest way to give your photos a unique effect or an extra dimension is to use Overlay.

You can experiment with light leaks, effects that simulate rain or mist, different textures, and a whole lot more. Be careful not to overdo it, otherwise your photos will look campy and amateurish.

bokehimage filtersOverlay Imagestexture
137 Posts
Editorial
  • How To Adjust Exposure in Photos Using Colorcinch
    Previous PostHow To Adjust Exposure in Photos Using Colorcinch
  • Next PostHow to Launch a Graphic Design Business: 9 Steps to Success
    How To Adjust Exposure in Photos Using Colorcinch

Related Posts

The Principles & Elements of Design – The ULTIMATE Guide
Blog Creative Graphic design

The Principles & Elements of Design – The ULTIMATE Guide

Essential Design Tips for Non-Designers
Blog Creative

Essential Design Tips for Non-Designers

How to Innovate Graphic Design for Digital Advertising in 2024
Blog Creative

How to Innovate Graphic Design for Digital Advertising in 2024

Mastering Color Harmony for E-commerce Photography
Blog Creative

Mastering Color Harmony for E-commerce Photography

colorcinch-dark

All Rights Reserved
© Colorcinch

Product

  • Home
  • Get started
  • Features
  • Pricing
More
  • Sitemap

Company

  • About us
  • Leadership
  • Careers
  • Affiliate program
  • Contact us

Information

  • Getting started
  • Online Cartoonizer
  • FX Cartoonizer
  • FAQ
  • Blog
  • Support

Subscribe to our newsletter:

© Colorcinch. All Rights Reserved.

Terms of Service Privacy Policy Disclaimers

colorcinch-dark
English
  • English
  • French
  • Spanish
  • Indonesian
  • Turkish
  • Arabic
  • German
  • Italian
  • Portuguese
  • Russian

Terms of Service Privacy Policy Disclaimers

  • Home
  • Get started
  • Features
  • Pricing
Copy

Forgot password