

Whether you’re a graphic designer, photographer, or marketer, there may come a time when you need to capture or portray a memorable holiday moment.
But it’s not always as simple as taking a picture. You may need photo editing features to bring your festive photos to life.
In this blog, we introduce advanced photo editing techniques to truly elevate your holiday snaps.
11 Advanced Photo Editing Tips for Professional-Looking Holiday Photos
Follow these eleven simple tips to add holiday cheer to your photos this year.
1. Use Your Histogram
There’s nothing more disappointing than capturing the perfect holiday photo only to discover that it’s too bright or dark.
Many photo editing tools show you a histogram, a graph that displays how light is distributed within your image.
Using your histogram will allow you to see the dark values, light values, and midtones. Based on the histogram, you can tweak your holiday photo to ensure it’s not too light or too dark.
Usually, the dark values will be on the left, bright values on the right, and mid-tones in the middle.
If it leans too far to the left, your photo may be too dark, and you risk losing details in the shadows. On the other hand, if the graph leans too far to the right, the photo might be too bright, and you might lose details in the highlights.
To create a perfectly balanced image with lights and darks, try to aim more towards the middle.
But remember, there’s really no rule that your image has to have a good balance between shadows and highlights. You can use your creative freedom to create a dark and moody image or a bright and ethereal photo for a memorable holiday composition.
2. Understand White Balance
Every light source has a color temperature. Cool tones include whites and blues, while warm tones include yellows, reds, and oranges.
While cameras do a good job of reproducing color in a manner that’s pretty close to how they look in real life, they can sometimes be inaccurate in displaying these tones. For example, your camera may make colors too warm or too cool.
This is where the white balance comes in.
White balance refers to setting your camera to represent the true tones of whites. This provides a baseline for how the camera displays other colors.
In a nutshell, adjusting the white balance allows you to create an image that looks more natural. However, certain subjects can create problems for cameras set to auto-white balance.
For example, if a subject is predominantly red, the camera may mistake the light source as warm light. The camera will automatically try to create a cooler effect to compensate, which can create a bluish color cast that’s not accurate.
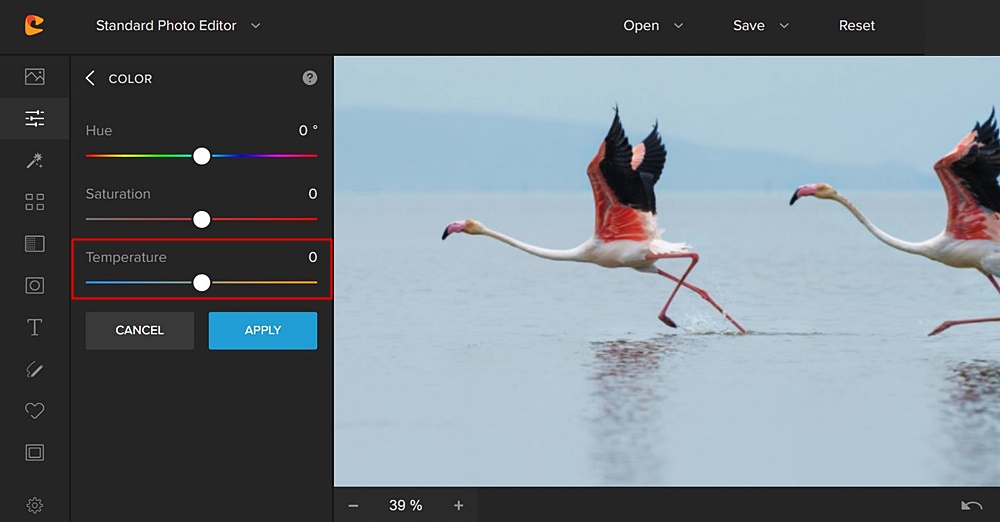
You can correct this problem using photo editing software. Colorcinch (formerly Cartoonize) offers features that allow you to edit the temperature of your photo.
After you upload your image, open the Edit menu. Click Enhance set, then click Color tool. Adjust the temperature slider to your liking. Click apply and then save the image.
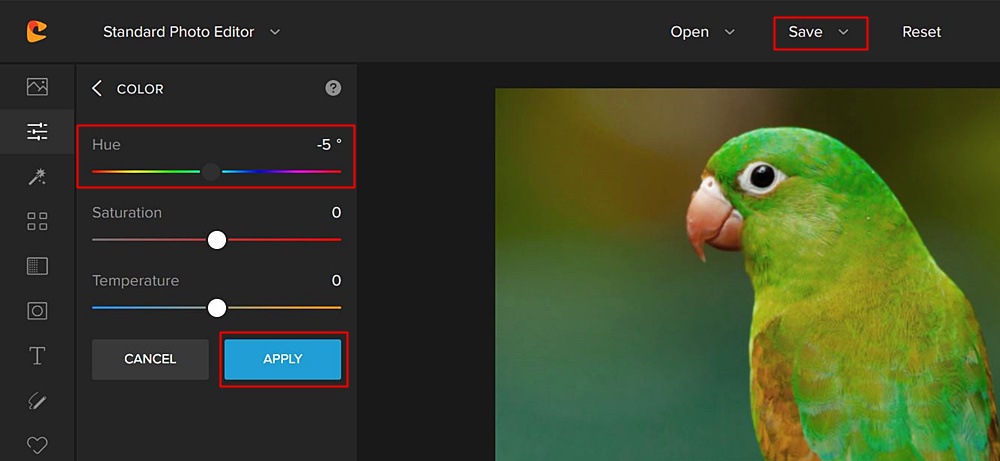
You can also achieve white balance using the Hue slider. The steps are almost the same as adjusting the temperature. But instead of adjusting the Temperature slider, use the Hue slider.
In the below image, you’ll see that moving the slider to -5° reveals more of a reddish brown hue for a warmer effect. As a result, base colors are more natural and balanced.
3. Utilize Double Exposure and Multiple Exposure Effects
Learn double exposure and multiple exposure techniques to merge two or more images into one. This way, you can create more unique and meaningful holiday images.
While double exposure involves layering two images, a multiple exposure effect often superimposes more than two images in a single frame, which creates an even more dynamic and intricate result.
You can use these creative effects to combine holiday portraits with landscapes, cityscapes, or natural elements for a more ethereal and dreamlike look.
To achieve a double or multiple exposure effect, use photo editing software to adjust opacity and blending modes and carefully position each image for seamless integration.
Start by uploading the image you want to appear in the background in your photo editing tool. Then, upload the second photo (or more if you use multiple exposures).
Use the editing software’s blending presets to add the effect you want. Most tools include Normal, Overlay, Multiply, Screen, Hardlight, and Softlight effects.
Try different blend modes to get the desired effect.
4. Learn Advanced Masking and Selection Techniques
Image masking allows you to manipulate specific parts of your festive photograph. This technique is key for editing detailed and complex objects like hair, fur, or transparent elements such as glass or water. Mastering these elaborate editing tricks is an important step in becoming a photographer or editor, so allow yourself plenty of time to practice.
Some advanced masking and selection techniques include:
Layer masks: Layer masks allow you to hide parts of an image without erasing them. This involves adjusting the transparency (opacity) of an image layer. To adjust the visibility and transparency of certain parts of an image, use brushes, gradients, or selection tools.
Refine edges: This advanced feature comes in handy when dealing with subjects with fine details and edges. Using the refine edge tool, you can select elements like hair, the branches of a Christmas tree, or any part of an image with edges to crop out.
Pen tool: You can use the pen tool in your photo editing software for more precise selections. Create paths and shapes around objects or specific parts of an image to create complex edits, masks, and removals.
Color range selection: Using color range selection allows you to select parts of an image based on color. As a result, you can quickly make targeted adjustments, whether to tweak the effects (i.e., hue, saturation, brightness, etc.) or change the color entirely.
Luminosity masks: Another advanced masking feature is a luminosity mask. This refers to selecting parts of an image based on their brightness. Applying luminosity masks gives you more granular control over highlights, shadows, and midtones.
5. Add Advanced Text and Typography Effects
You can add text and typography to your holiday snaps by typing or using overlays. This feature is useful for various situations, such as marketing, social media posts, or memes.
You can use a wide range of advanced features to incorporate text and typography in your photos for more visual appeal.
These include:
Text masking and blending: Text masking and blending allows you to blend your text seamlessly with the image, texture, and other graphical elements.
Texture and pattern fill: You can add different textures and patterns to create more visual interest in your typography. Examples of holiday-themed images and textures to add to your text include Christmas ornaments, tinsel, candy cane stripes, festive fabrics, or snowflake patterns.
Type on a path: This feature allows adding text to any path or shape outline. To achieve this, draw the path you want your text to appear on. Then, choose the font, size, and color of the text. Use the path selection tool and drag on the beginning of the text to move it up the path.
3D text effects: Add depth and dimension to your typography with 3D effects.
Add and fully customize your text with Colorcinch. Turn any festive background into marketing material that pops.
To streamline your process, consider using a photo editor that integrates with text-to-speech software.
Using just your voice, you can add personalized holiday greetings and captions. Fusing visual and vocal elements ensures your holiday memories aren’t just seen but also heard, making them all the more special.
6. Implement Photo Compositing
Photo compositing involves using two or more different images to create a new one.
To achieve a seamless composition:
Swap out the sky in your images with a different sky from another photo.
Play with colors, shadows, midtones, and highlights.
Create textures.
But before you implement photo compositing, plan your desired outcome. Consider the elements you want to include and how they’ll come together to create a cohesive composition.
For example, maybe you’re editing a family holiday image, but you want to add a beautifully decked Christmas tree in the background to make the subjects pop out more.
To achieve this, you can use the selection tools and advanced masking techniques within your image editing software to separate the subject from its original background and add a new one.
To create a consistent look throughout your image, adjust shadows and highlights. Layer blending and masking can also help you create harmony in your photo’s different colors and elements.
7. Add Visual Flair With Advanced Photo Filters and Effects
Dive into the world of filters, effects, and photo adjustments to make your festive photos pop.

Some special effects to add to your images include:
Selective focus and tilt-shift
Texture and overlay effects
Glow and soft focus
HDR tone mapping
Brush stroke filters
Color grading
Sketch filters
Artistic filters
Distort filters
Noise filters
Vignetting
Blur filters
Remember, adding special effects to your images doesn’t have to be limited to using advanced photo editing tools.
You can transform your holiday images with decorative picture frames to display in your home or office. From classic wood frames to sleek metallic styles, there are many options when selecting the right picture frame for your composition.
8. Enhance Contrast for a Dramatic Effect
In many situations, an image with high contrast isn’t the most visually pleasing. But with the right balance of shadows and highlights, you can create the perfect composition.
Enhancing contrast adds mystery and drama to your photos, which look great in portraits.
Most photo editors have various tools that allow you to easily adjust contrast with one click. Common presets include linear, medium, and strong contrast.
If these presets aren’t to your liking, you can customize your results with the contrast slider.
You can also use tone curves, a more advanced technique, to increase or reduce contrast in your image. This tool allows you to adjust the brightness of certain photo parts, giving you more creative control over balancing lights, shadows, and midtones.
9. Crop Your Images Carefully
Everyone who’s ever edited a photo is likely familiar with cropping, whether they’ve encountered the feature on their phone or an image editing tool.
But cropping goes beyond just editing out an unwanted subject or element. It can also bring more focus to a specific part of your image.
To crop effectively, carefully consider the straight lines within the image. Within your editing software, use the grid it provides to get an idea of how your image will look once cropped.
Make sure the lines from the grid match the straight lines in your photo. For example, in a picture of someone walking, the horizontal line in the grid should align with their feet.
This adds symmetry and balance to your holiday photography.
10. Remove the Background
To get viewers in the holiday spirit, consider changing the background of your image. Maybe your current background is the beautiful blue sky or the facade of a home decorated with bright Christmas lights.
But for a more stylistic effect, you can add a nice festive background, whether colorful ornaments, candy canes, or snowflakes.
There are many ways to remove an existing background. Many photo editors have a background removal tool, magic wand tool, magic eraser tool, pen tool, and quick selection tool.
11. Correct Exposure
An overexposed or underexposed image isn’t the most visually pleasing outcome. And you want your images to come out as balanced as possible, especially when making holiday memories.
If your image is too bright or dark, you can use a photo editor to correct the exposure. Most photo editing software has a tool that allows you to adjust exposure or brightness.

Wrapping Up
You don’t have to be a photo-editing wizard to achieve compositions embodying the holiday season’s joys and festivities.
But you need to know about advanced photo editing techniques beyond the standard filter or correction features.
And there’s a way to do this without getting too technical and complex. The right tool that removes the steep learning curve of using creative software can make your photo editing experience less painful.
Get started with Colorcinch today to craft stunning visuals that tell compelling holiday stories.
About Guest Author: Guillaume Deschamps
Guillaume is a digital marketer focused on handling the outreach strategy at uSERP. Outside of work, he enjoys his expat life in sunny Mexico, reading books, wandering around and catching the latest shows on TV.