
Is your WordPress site a sluggish nightmare? Poorly optimized images are often the culprit! A whopping 61% of a page’s weight comes from visuals. WordPress image optimization helps you upload stunning visuals that load lightning-fast. Studies show that 47% of visitors expect a 2-second load time or less.
You can transform your slow WordPress site into a speed demon with remedies like WebP format, lazy loading, and smart plugins.
Keep reading to learn how to speed up your site using WordPress image optimization hacks.
Why Image Optimization Matters for WordPress Sites
Visuals engage potential visitors and leave a lasting impression. For WordPress websites, a picture is worth a thousand words if well-optimized.
Visuals are processed 60,000 times faster than text, and articles with images get 94% more views than those without. Savvy site owners use high-quality images to grab visitors’ attention, break up text-heavy content, and create a more immersive experience.
Some stats show that 47% of site visitors want a web page to load in 2 seconds or less, and 40% will bounce if it takes more than 3 seconds to load.
Unoptimized images often lead to sluggish load times since they make up to 75% of a page’s total weight.
Slow-loading pages isn’t only frustrating to users but hurts your search engine rankings.
Besides that, Google confirmed that page speed is a ranking factor for desktop and mobile searches. If unoptimized images bog down your WordPress site, you could miss out on valuable organic traffic and potential customers.
And since more than half of all web traffic comes from mobile devices, you want to ensure your images are optimized for smaller screens.
Responsive images that adapt to different devices boost your site’s mobile-friendliness and user experience. WordPress site owners can reduce mobile users’ data usage and loading times by serving appropriately sized images.
Practical Image Optimization Strategies for WordPress
Here are a few handy ways you can have your WordPress site loading at lightning speed:
1. Choosing the Right Image Format (JPEG, PNG, WebP)
Each image format has its perks and downsides, and understanding these differences keeps your site looking sharp and loading fast.
JPEG suits photographs and complex images with many colors. It packs stellar compression, reducing file sizes without waiving too much quality.
In fact, Google found that JPEG compression reduces image file sizes by up to 80% without noticeable quality loss.
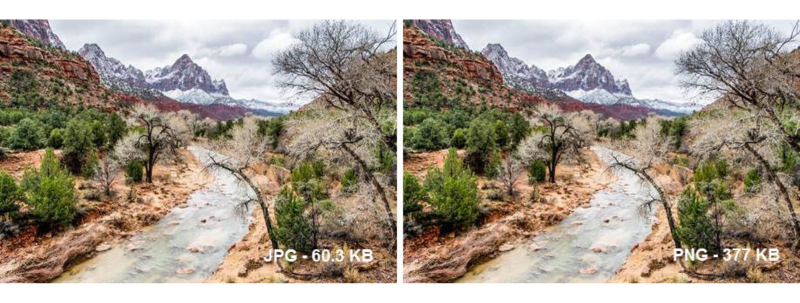
Use PNG for graphics with transparency or simple images with few colors, like logos or icons. PNG employs lossless compression, meaning no quality is lost during compression.
But, this also suggests PNG file sizes can be larger than JPEGs. PNG is best for images with fewer than 16 colors.
WebP, Google’s new image format, has the best of both worlds. It works perfectly for lossy and lossless compression, transparency, and animation by slashing image sizes by up to 34% compared to JPEG and 26% in contrast to PNG.
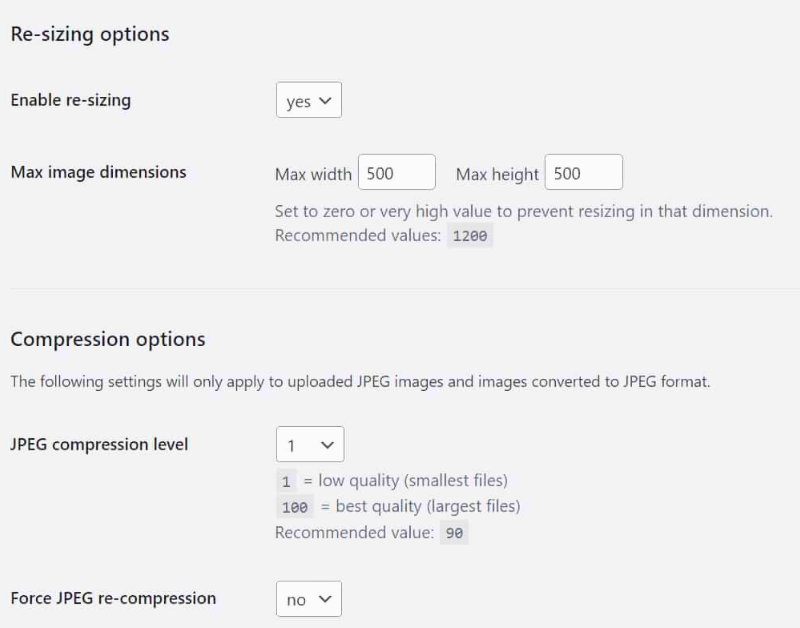
2. Resizing and Compressing Images Before Uploading
Resizing your images before uploading them is a foolproof WordPress optimization hack.
First, resize your images to fit your website’s layout and make them responsive for mobile users.
Site visitors will bounce once they’re met by a gigantic image that takes forever to load or a tiny thumbnail that requires a magnifying glass to view.
Tools like Adobe Photoshop or online resizers like Colorcinch make this process painless. Next, it’s time to compress those images and reduce the file size without sacrificing quality.
The HTTP Archive surveyed millions of websites and discovered that compressing images can slash your page weight by a staggering 21%. That’s like shedding a fifth of your page’s weight.
3. Using WordPress’s Built-In Image Editing Tools
WordPress has nifty built-in editing tools for optimizing your images. Consider this option if you want to dodge those premium plugins.
WordPress automatically creates multiple versions of the image in different sizes(thumbnail, medium, and large) when you upload them to your Media Library.
This feature, called Image Scaling, helps serve up the right-sized images based on where you want to display them on your site.
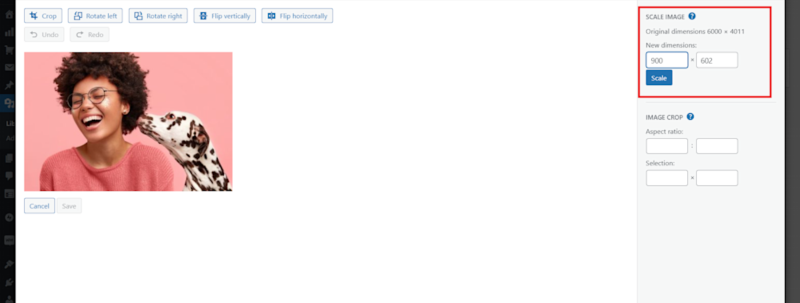
You can also use the built-in Edit Image feature to fine-tune your images. Click on a visual in your Media Library and select “Edit Image“.
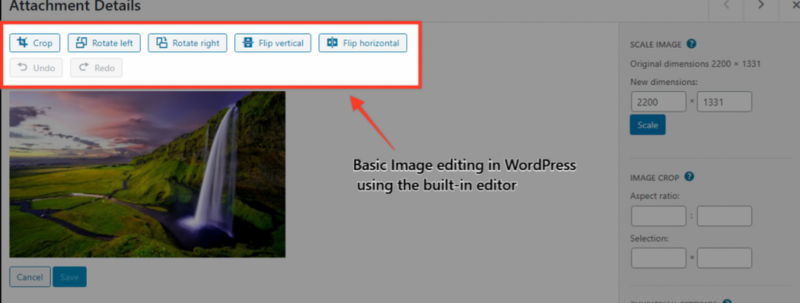
The feature resizes, crops, and rotates an image to your liking. WordPress site owners can also change the image file type and tweak the compression quality to strike the perfect balance between file size and visual clarity.
Alt Text also lets you add a short description to your images. It helps search engines understand what your images are all about, which can boost your SEO.
4. Leveraging Browser Caching for Faster Image Loading
Browser caching allows a user’s web browser to store specific files (like images) locally.
They won’t have to be downloaded from the server anytime a user visits your site. Their browser can load the cached images much faster during a second visit, which slashes page load times.
It cuts down on the amount of data that needs to be transferred. Yahoo! found that enabling browser caching can reduce page load times by up to 50% when done right.
Editing the .htaccess files could help enable browser caching. You’re simply telling browsers how long they should store certain files before requesting a fresh copy from the server.
These rules tell browsers to cache different image formats for one year from the time they were last accessed.
It’s easy to adjust the time frame based on your specific needs and how often you update your images.
Caching plugins for WordPress are an easier alternative if editing your .htaccess file feels somewhat technical.
Try options like W3 Total Cache or WP Super Cache to automate the process.
For performance tests, use GTmetrix or Google PageSpeed Insights to assess your page load times before and after enabling the feature.
You can also use the Network tab in your browser’s Developer Tools to see which files are loaded from the cache.
5. Implementing Lazy Loading for Improved Page Speed
Lazy loading delays the loading of non-critical resources (like images) until needed.
Instead of loading all images once when a user visits your page, lazy loading only loads the images visible in the user’s viewport.
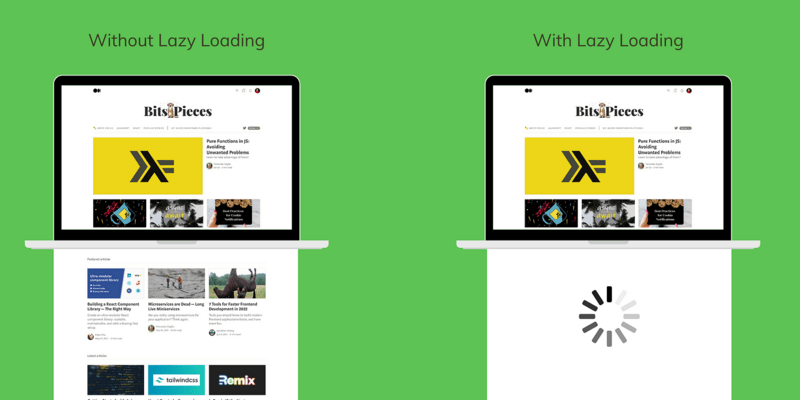
The remaining images are loaded as they come into view. Lazy loading reduces the initial page load time since your WordPress site only needs to load the visible images.
Use the “loading” attribute on your <img> tags to enable lazy loading:
<img src=”example.jpg” loading=”lazy” alt=”Example Image”>
By adding loading=”lazy” to your image tags, you’re telling the browser only to load the image when it comes into the user’s viewport.
Most of all, you could use WordPress image optimization plugins to automate the process.
6. Serving Responsive Images for Different Devices and Screen Sizes
Your WordPress visuals should be responsive across different screen sizes.
Use this <picture> element and srcset attribute to make your images responsive:
<picture> <source srcset=”image-large.jpg” media=”(min-width: 1200px)”> <source srcset=”image-medium.jpg” media=”(min-width: 768px)”> <img src=”image-small.jpg” alt=”Example Image”> </picture>
Basically, you’re telling the browser which image to use for different screen sizes. The media attribute sets the minimum screen width for each image, and the <img> element at the end is a backup for older browsers.
WordPress has your back with built-in responsive image functionality if you’re not an HTML pro.
Just upload your image to the Media Library, and WordPress will create different-sized versions automatically. With WordPress functions like wp_get_attachment_image_src() and wp_get_attachment_image(), you don’t have to write a single line of code.
Utilizing WordPress Plugins for Image Optimization
Manually resizing, compressing, and converting images can be a pain. For this reason, using an image optimization plugin is worth it, as it automates the whole process for you.
You just need to install it, connect it to your media library, and let the plugin automate the optimization process.
Most plugins will automatically compress images when uploaded, plus offer bulk optimization options to speed up images already in your media library. It’s an easy way to lightweight your images without sacrificing visual quality.
One of the notable perks is the time and effort these plugins save you. Rather than manually optimizing each image, you can let the plugin handle compressing, resizing, converting to new formats like WebP, and more in the background.
The best plugins are designed to be an all-in-one solution for image optimization. A tool like ShortPixel, for instance, optimizes images without you having to worry about losing quality.
The plugin uses smart compression techniques that shrink file sizes substantially while maintaining crisp image resolution. Your images will load faster for visitors without that grainy or pixelated look.
Besides bulk optimization, you can leverage its lossy and lossless image compression features. On top of compressing images, you get automatic resizing and adaptive images.
As a result, images load at the optimal size and resolution for each user’s device and screen size. Your mobile visitors will only load smaller image files rather than massive desktop versions.
This significantly improves loading speeds across devices. Installing a premium image optimization plugin pays off if you run an image-heavy WordPress site.
Your media library will be lighter and leaner in a snap. With faster load times and seamless quality, your images will have superb resolution across different screen sizes.
Maintaining Optimized Images on Your WordPress Site
Keeping your images optimized on your WordPress site is an ongoing task, not a one-and-done gig. Here are a few tips for keeping your site in order:
1. Getting Your Image Workflow in Order
To make sure your images stay fast and compact for the long haul, start by getting your workflows in order.
Lay out some ground rules for resizing, formatting, and compressing images before uploading them.
Provide checklists to ensure your team prepares images properly. Use automation to compress and convert new uploads so they meet standards immediately.
Do a thorough re-optimization of your media library periodically so everything stays fresh.
2. Training Your Content Crew
Next up is getting your content crew up to speed on best practices. Share the nitty gritty on ideal image dimensions, file types, compression levels, etc.
Explain how to use title and alt text correctly for SEO and accessibility. Keeping your team informed as things change means you’ll stay optimized.
3. Regular Check-ups
Schedule quarterly check-ups to give your media library a good lookover and spot anything needing optimization.
Update formats, compress new images, and toss redundant ones. Use tools to automatically flag issues like massive images and manually review them for quality.
Stay current on updates like converting to WebP for faster loads, and monitor your media library to keep it in top shape.
4. Staying on Top of Performance
Keep tabs on your site speed and image file sizes. Diagnose slowdowns and find fixes. Check reports and analytics to pinpoint pages where unoptimized images drag down the page load time.
5. Brushing Up on Image Optimization Trends
Make time to research new optimization solutions and check out new WordPress plugins that could simplify your workflows.
Test newer compression formats like AVIF and consult resources on image SEO to step up your approach. Staying in the know keeps your optimizing skills sharp.
Conclusion
Optimizing images should top your checklist if you’re a WordPress site owner looking to speed things up. You can dramatically cut load times and satisfy users by picking the right formats, resizing carefully, turning on caching and lazy loading, and using automation tools.
Find that sweet spot between blazing-fast performance and a seamless visual experience on all devices. Make optimization a regular part of your work, keep watching your site speed, and learn about new best practices as they emerge.
Optimizing images takes work as technology marches on, but it’s the effort that pays off. With some dedication, your WordPress site can have an image library that loads incredibly fast without sacrificing visual quality.
Your users will spot and value the work you’re putting in to give them a super smooth, speedy experience.