

A watermark is a text, logo, graphic, or the artist’s signature superimposed on an artwork. While its primary purpose is to discourage others from stealing the image, it has many other functions too. Let’s have a look at them and also see how to make our own watermark.
Why Use a Watermark?
If there’s one disadvantage of digital photography’s dominance, it has to be the ease with which others can steal your images. You may not be bothered about others using your images but for professional photographers, that’s the source of their bread and butter.
Using watermarks is one of the best ways you can discourage such behavior. Additionally, by using a watermark, you can brand your work and get your name/business out in front of a larger audience and promote it.
Types of Watermark
1. Text Watermark

The most basic way to use a watermark is to simply superimpose relevant text. Now you may ask what all info we can add in a text watermark. Well, you can:
- simply type your name
- type the link to your website or other social media handles
- type the name of your photography business
While this is a very simple approach, it also has the advantage of being to the point and legible.
As simple as a text watermark appears, you’ll be surprised with how easy it is to make one too using Colorcinch.
Step 1: Upload your image to Colorcinch.

Step 2: Navigate to Text and click on Add Text. A text box will appear on the image. Click on it and type what you want as your watermark.

Step 3: Format the text using the various tools available in the text menu. You can do various things like change the font color, spacing, height, and opacity. You can also add a background color, an outline, and even shadows.

Step 4: Once done with the formatting, resize the watermark by using one of the control points in the text box. Finally, drag the watermark to one of the corners. Voila! your text watermark is all done.

2. A Logo Watermark
 If you have a photography business, then using a logo watermark makes perfect sense. But wait, that’s not all. Brands across the world place their logo too in their promotional images.
Placing a logo as a watermark thus not only helps prevent unauthorized use of images but also helps in establishing your brand image and getting your name out there. After all, it’s easier to remember an image than to remember names and websites.
If you already have a logo of your personal business or need to place a watermark for a brand, let’s see how you can quickly do so using Colorcinch.
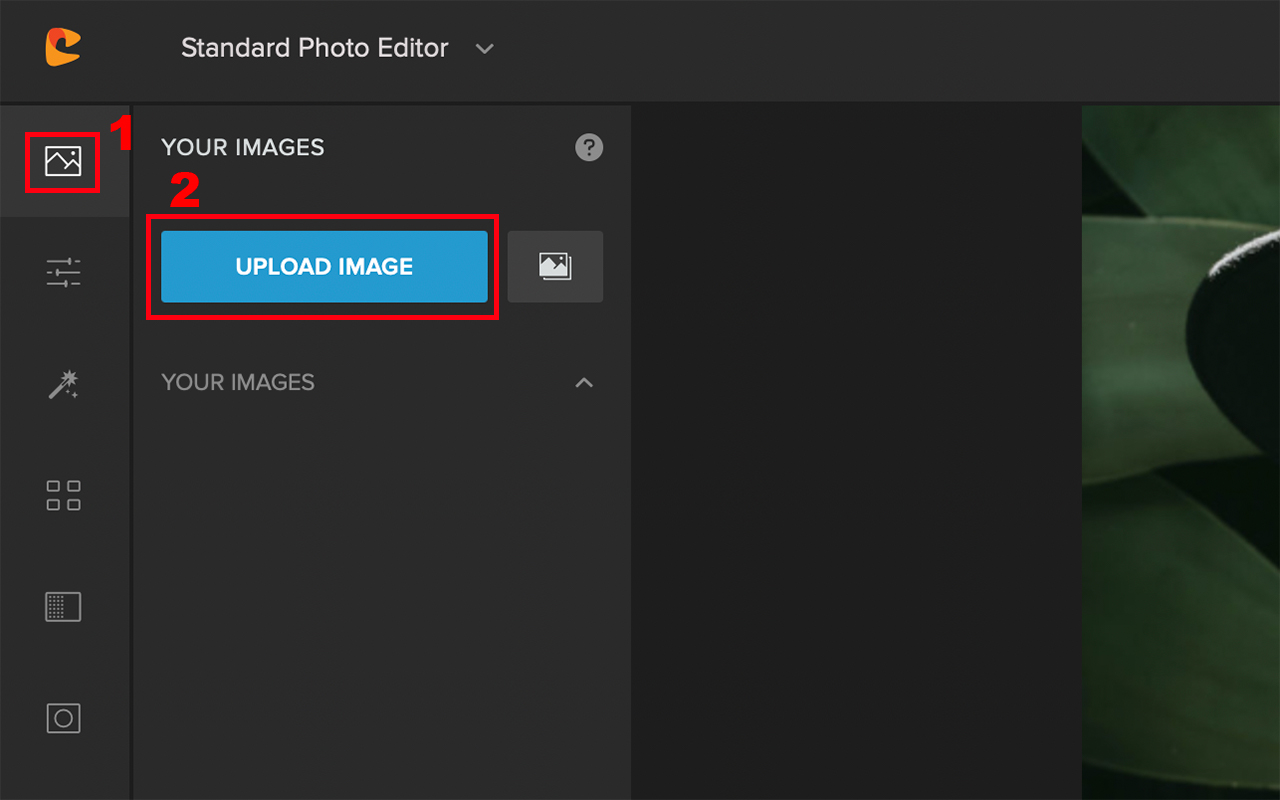
Step 1: Upload the image to Colorcinch.
Step 2: Navigate to Image Manager and click on Upload Image. Then, navigate to the path of your logo and upload it to Image Manager. The uploaded logo will appear in Your Images section.

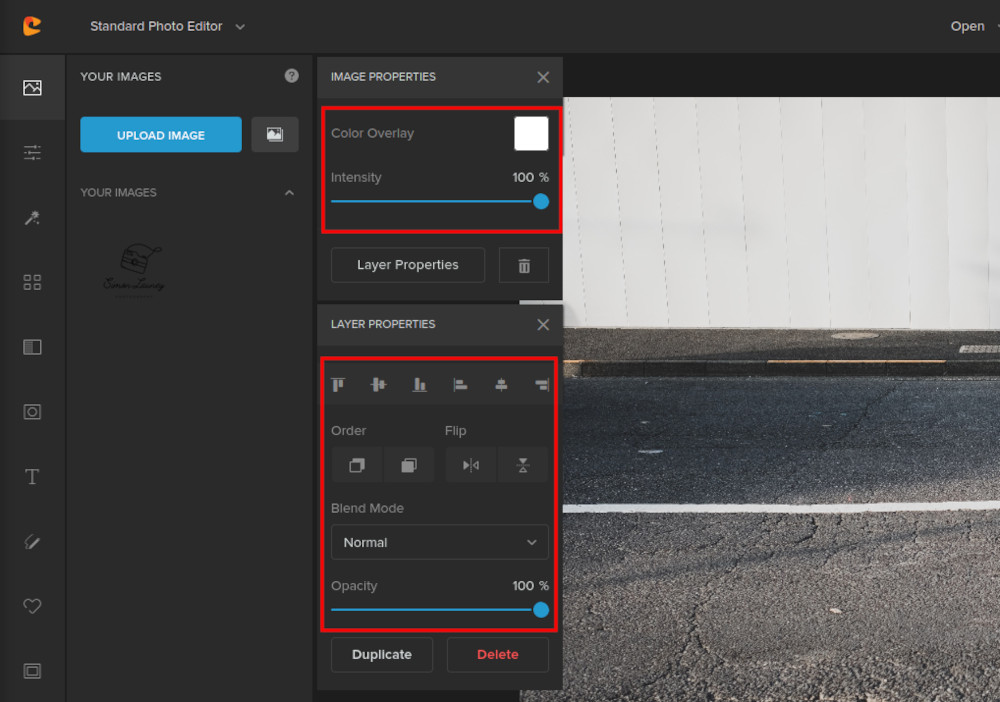
Step 3: Click on the logo and select Add to Project or simply drag the logo on top of the image. Once the logo is placed, you can change its color by using the Color Overlay feature.
You can further adjust the alignment, order, opacity, and even flip the image by clicking on the Layer Properties.
Step 4: Once you’re done making any adjustments to the logo, resize it using any of the control points. Then, drag it to a corner so that it does not appear distracting.


3. Watermark From Signature
Using your own signature as a watermark has to be one of the classiest ideas. It is a great way to personalize an image as it appears to have a better human touch than when text or logo are used.
And don’t worry, it is not essential that you use a stylus to digitally sign your photos. We can easily make a watermark out of your signature using Colorcinch.
First, let’s prepare the signature to be used as a watermark.
Step 1: Get a clean white piece of paper and a black pen. Sign the paper with your best signature.
Step 2: Scan the paper if you have a scanner or else photograph it. It is a good idea to slightly overexpose the image while ensuring that the writing is not blown out.
Step 3: Upload the image of your signature to Colorcinch.
Step 4: Navigate to Image Manager and click on Upload Image to upload your signature.
Now that your signature has been uploaded to Colorcinch, let’s see how you can use it as a watermark in an image.
Step 1: Upload the image in which you need to place the watermark to Colorcinch.
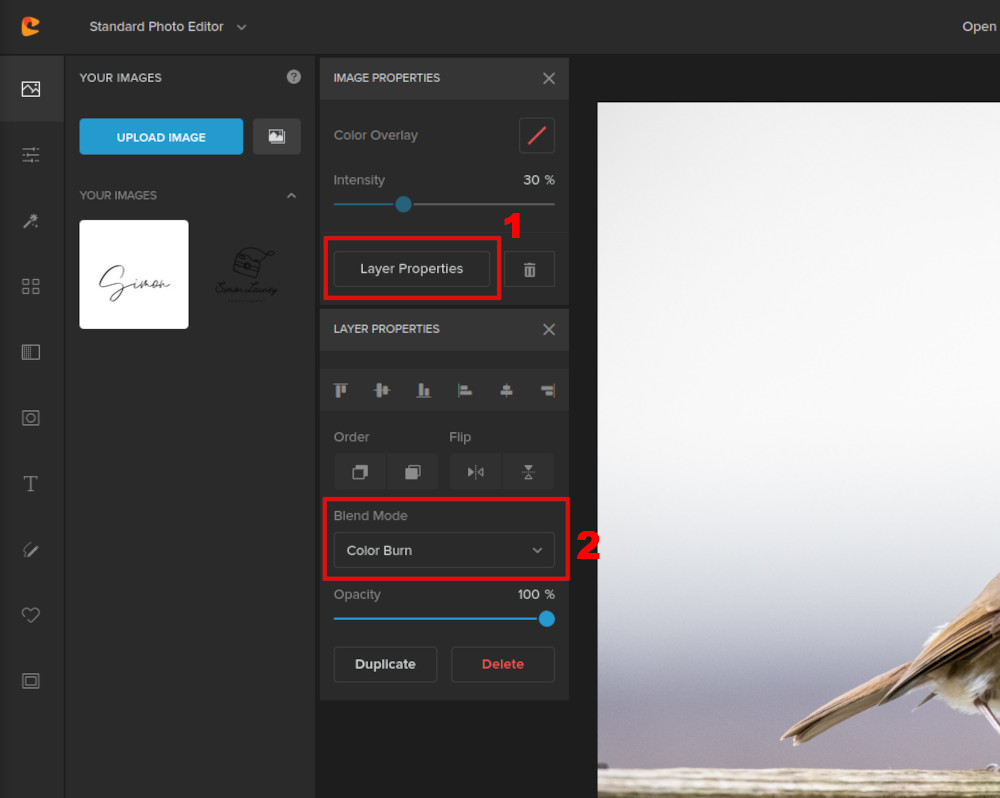
Step 2: Navigate to Image Manager. Place the image of your signature over the photo.

Step 3: Now, to remove the white background of the signature, simply click on it and go to Layer Properties and change the Blend Mode to Darken, Multiply, or Color Burn.
As you can see, making a transparent watermark from your signature has never been easier.


To Sum It Up
Remember, putting up a watermark in your photos does not guarantee the full protection of your images. It is just a means of letting others know that you’re serious about your work and that you don’t want others misusing it.
Also, be respectful to your own work when using a watermark. A proper watermark should not distract the viewers from the focal point of your image. In fact, they should be “just noticeable”. Avoid using multiple watermarks and it’s best to keep it away from the prime subject.
Whether you want to learn how to make a watermark that’s text-based, a logo, or even a signature, the quick ways we discussed here will definitely help you out. Try out at least one of these watermark techniques and safeguard your work.